21
2014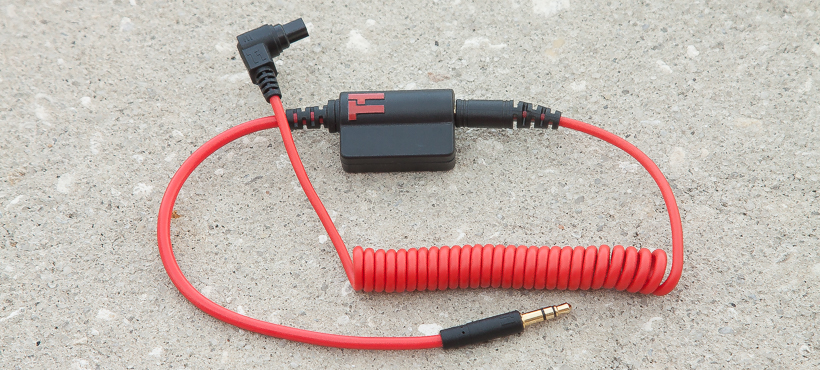
What is it?
You have phone; you have a camera. Wouldn’t it be nice to be able to trigger your camera from your phone? And, since your phone is, in essence a miniaturized computer, wouldn’t it be great if you had an app enabling you to use your phone as a programmable intervalometer and shutter release? Also, if you could use your phone as a trigger, wouldn’t it be interesting if you could use your phone’s sensors to trigger your camera based on sound, vibration, and so on?
That, in a nutshell, is TriggerTrap: a mobile dongle you can use to connect your camera to your iOS or Android devices for about $35. It’s compatible with a wide range of cameras from Canon, Nikon, and Sony to Fuji, Panasonic, and a slew of others.
Using it
TriggerTrap is straightforward to use: connect it up to your camera, choose your mode in the app and fire. You’ll have to think about how to mount your phone to your camera or tripod, but that’s a pretty easy hurdle to get over. I ended up with the ChargerCity hotshoe mount for $15. There are more expensive options out there (especially if you want to mount your phone to your tripod; something you’ll want to do if you’re working in windy conditions), but for $15 you can’t go wrong.
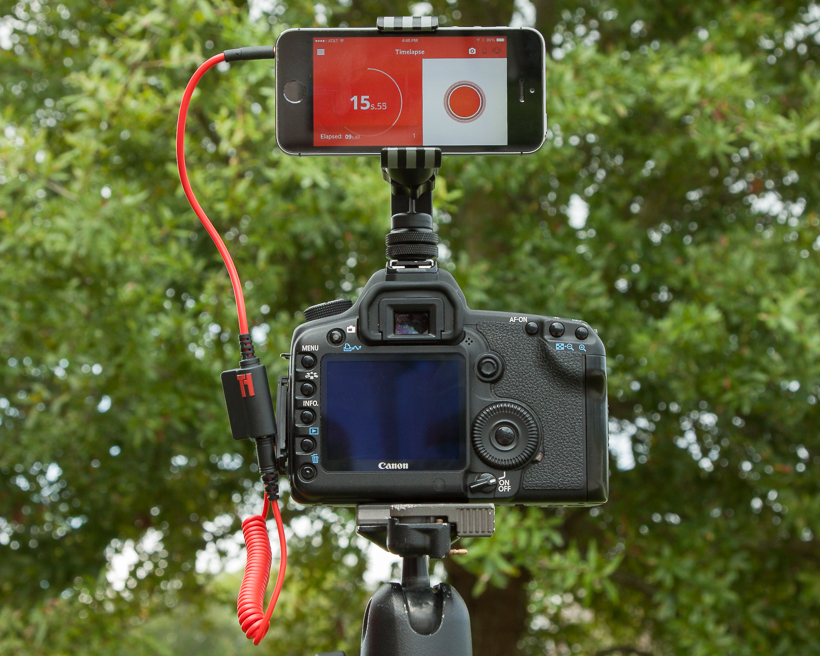
TriggerTrap mounted using a flash hotshoe bracket
Camera Control Functionality
TriggerTrap is not a full camera controller (it doesn’t control ISO, aperture, and so-on). Nonetheless, it does offer a wide range of functionality. Just take a look below at all the modes available in the app: you won’t be short on things to do! (the app is free, by the way, so you can download it and experiment to get a sense of the user interface):
Cable Release Modes
- Simple Cable release*: use your phone to take a photo
- Quick release*: TriggerTrap will take a photo when you release a button
- Press and hold: keeps the shutter open while your hand is on a button (i.e. bulb exposure)
- Press & Lock: a bulb exposure where you press a button to start then press the button again to stop
- Timed Release: program the exposure time for a bulb exposure
- Self-Timer*: set a timer and get ready for the camera to be triggered
Timelapse Modes
- Timelapse*: a simple intervalometer. Set the exposure time on your camera and use TriggerTrap to fire the camera
- TimeWarp*: vary the interval time between exposures to speed up and slow down motion within a sequence (think car traffic speeding up and slowing down in your timelapse)
- Distance Lapse*: take an exposure at a specified distance
- Star Trail: set the number of exposures, the exposure time, and the interval between exposures
- Bulb Ramping: take day-to-night/night-to-day timelapses
Sensor Modes
- Sound Sensor*: capture an image when a sound reaches an amplitude threshold
- Vibration Sensor*: capture an image when a selected vibration threshold is reached
- Motion Sensor: capture an image when a predefined number of objects move in front of the camera
- Peekaboo*: capture an image when a predefined number of faces are detected
HDR Modes
- LE HDR: select the number of exposures, exposure step, and the middle exposure time to shoot HDR sequences
- LE HDR Timelapse: shoot an HDR timelapse by specifying the middle exposure time, interval time, and exposure step.
*can be used to take images with your phone’s camera.
Some other cool stuff:
Many of TriggerTrap’s modes allow you to use one phone/tablet/etc as a master and others as a slave. For example: you can use your iPhone to trigger your camera while also triggering several speedlites.
TriggerTrap also has a handy neutral density filter calculator and simple solar calculator showing you Sunrise and Sunset times.
As an HDR trigger
TriggerTrap will work great to trigger an autobracket sequence you have programmed into your camera. It’s also a great device to allow you to take those 5,7,9+ HDR exposures. However, there’s one thing you need to keep in mind if you’re going to put your camera into Bulb mode and use TriggerTrap to set the exposure times. That thing is: every camera has a minimum bulb exposure time. A good limit is somewhere around 1/20th of a second. What this means is you won’t be able to shoot that 1/100 exposure during the day. This won’t be an issue if you’re shooting before sunrise/after sunset, but it will be an issue for you if you’re shooting during the day without a neutral density filter. While this is more of a camera limitation than a TriggerTrap limitation, it’s still something to keep in mind.
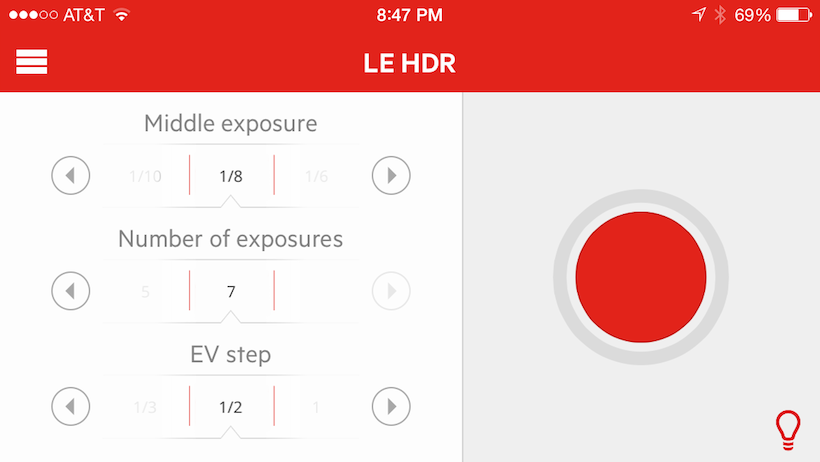
TriggerTrap used to take 7 exposure HDR
As an intervalometer
As a simple intervalometer TriggerTrap is great. It’s very intuitive to use and I like how the app uses a graphical indicator to tell you when the next exposure will be fired. For more complex intervals, you can use the Star Trail mode to dial-in the exposure time and the interval between exposures. I’d name the Star Trail mode something else as it does more than just Star Trails, but that’s not a big deal.
I like the Time Warp and Distance Lapse modes, especially the simulation in the TimeWarp mode to give you an idea of what the acceleration and deceleration of the interval will look like. Distance Lapse is very handy for shooting sequences in a car. The one thing I didn’t like is bulb ramping.
Bulb Ramping
As it stands, TriggerTrap’s bulb ramping exposure controls modifies exposures from the beginning of the ramp to the end of it. It would be nice if you could start a specific exposure then wait a predetermined time before ramping. From there, it would be ideal to set how long to ramp for before reaching the end ramp exposure and then continuing on at a final exposure time. It would also be nice to speed up/slow down the ramping rate if need be.
You won’t care if you won’t be using TriggerTrap to shoot Holy Grail timelapses, but this is something I would very much like to see improved in future releases.

TriggerTrap Bulb Ramping Interface
Other Tidbits:
Get an iPod Touch: But everyone uses phones now! I know, but you’re going to miss your phone when you’re shooting an three-hour-long timelapse and have nothing to do but sit around and wait. Especially if you want to use your phone to, you know, make phone calls.
Connect everything then turn on the app: I had some trouble initially getting the camera to trigger. To get it to work, I needed to first connect the camera and phone, turn up the phone volume to max then start the app.
External Battery Source: you’re going to want a battery pack for your phone if you’re planning on doing long duration timelapses. (Anker’s 3200mah battery is a good choice). Battery packs aren’t too expensive these days, you’ll want to keep one on hand.
Should you buy it
I suspect Canon users (like me) will find TriggerTrap more compelling than Nikon users. Nikoners (Nikonites?) with their built-in intervalometers may not find TriggerTrap a need, unless features like TimeWarp, Distance Lapse, and the Sensor modes are desired creative options.
Overall, it really depends on what your expectations are. TriggerTrap is a good device at a reasonable price point. If you’re looking for a hardcore intervalometer, however, TriggerTrap may not be for you – especially with the limited bulb ramping functionality.
That said, TriggerTrap has historically been good at updating their app and adding features; it’s not inconceivable for the bulb ramping to be improved in the future. Also, in terms of user interface, TriggerTrap is easy to use and program.
Where to buy
Amazon: Dongle only (you will need a cable compatible with your camera)
Amazon: Nikon (Dongle + Cable)
TriggerTrap: Canon (Dongle+Cable)
Amazon: Charger City Phone hotshoe Mount
Amazon: Anker 3200mah external battery


